> ## Documentation Index
> Fetch the complete documentation index at: https://docs.langdock.com/llms.txt
> Use this file to discover all available pages before exploring further.
# Bring Your Own OAuth Client
> Set up custom OAuth applications for integrations, assign clients to your workspace or user groups, and control scopes, tenant policies, and branding.
You can use multiple custom OAuth clients for the same integration. Set one client for your entire workspace and assign additional clients to specific user groups. This lets different groups use the same integration with different OAuth clients.
## How Custom OAuth Works
When you configure a custom OAuth client, Langdock routes new authentication flows through the OAuth application assigned to each user instead of the default Langdock client. A client for the entire workspace applies by default, while group clients apply to members of the assigned groups. This means:
* **Your branding** (custom name and logo) appears in consent screens
* **Your tenant policies** control user access and admin consent requirements
* **Your rate limits** apply to API calls made by your users
* **Your user groups** can authenticate through separate OAuth clients
Register a new OAuth application in your provider's developer portal (Google Cloud Console, Microsoft Azure, etc.).
**Required Configuration:**
* Copy the exact redirect URL from Langdock's integration settings
* Select all required scopes shown in Langdock for that integration
* Configure any tenant-specific settings (admin consent, allowlisting)
Note down the following from your OAuth app:
* **Client ID** (always required)
* **Client secret** (required for most integrations)
* **Tenant ID** (optional, shown for Microsoft integrations only)
Go to [**Workspace settings → Integrations**](https://app.langdock.com/settings/workspace/products/integrations), select the integration, and scroll to **Bring your own OAuth Client**.
Click **Add another OAuth client** when the integration includes a Langdock client. If the integration requires your own client, click **Configure your OAuth client to use this integration.**
In the configuration dialog, copy the **Redirect URL** into your OAuth app and review the **Scopes** section. Make sure all listed scopes are enabled in your OAuth app — missing scopes will cause an insufficient scopes error. You can copy all scopes at once using the copy button.
For integrations with action-level permissions, we recommend keeping **Sync scopes with enabled actions** turned on by default. Langdock then requests the auth scopes plus the scopes required by enabled or shared actions, keeping requested scopes aligned with the actions your workspace can use. Learn more in [Manage Action-Level Scopes](/en/admin/manage-integrations/manage-action-level-scopes).
Optionally add a descriptive **Client name**. Under **Access**, choose **Entire workspace** or **Groups**. Enter your **Client ID** and **Client secret** (and **Tenant ID** if prompted for Microsoft integrations), then click **Save** and confirm the change.
Select the saved client from the client list and confirm the switch to activate it.
Once active, new connections for users with access to this client use it immediately and only work if the credentials are valid. Existing connections remain linked to the client they were created with.
Have a user connect their account to verify:
* Consent screen shows your client
* Required scopes are granted
* Data access works as expected through actions
## Assign OAuth Clients to User Groups
Use group access when different parts of your organization need separate OAuth applications for the same integration. For example, assign one client to a subsidiary with its own Microsoft Entra tenant, or use a separate client when a department needs a different approved scope set. The client for your entire workspace remains the default for everyone who is not covered by a group client.
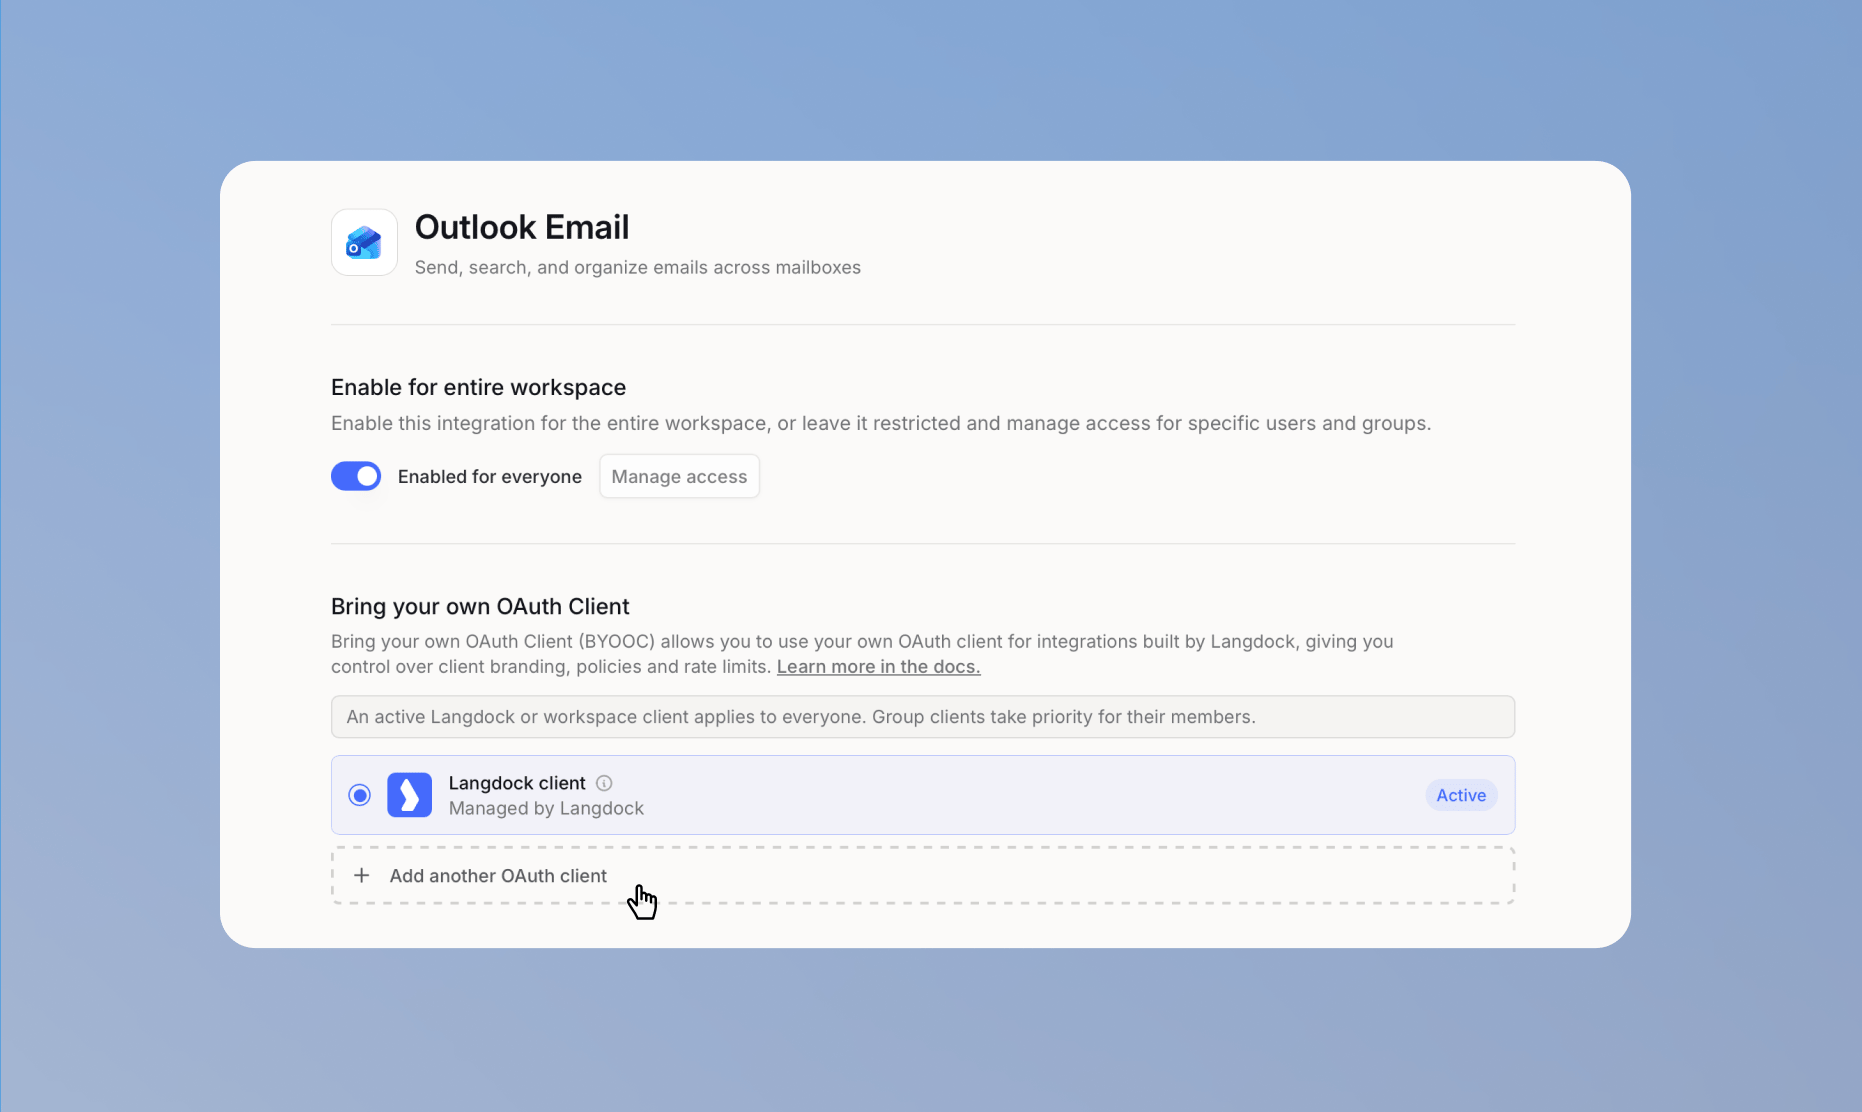 Click **Add another OAuth client**. Optionally give the client a descriptive name so you can identify it in the client list.
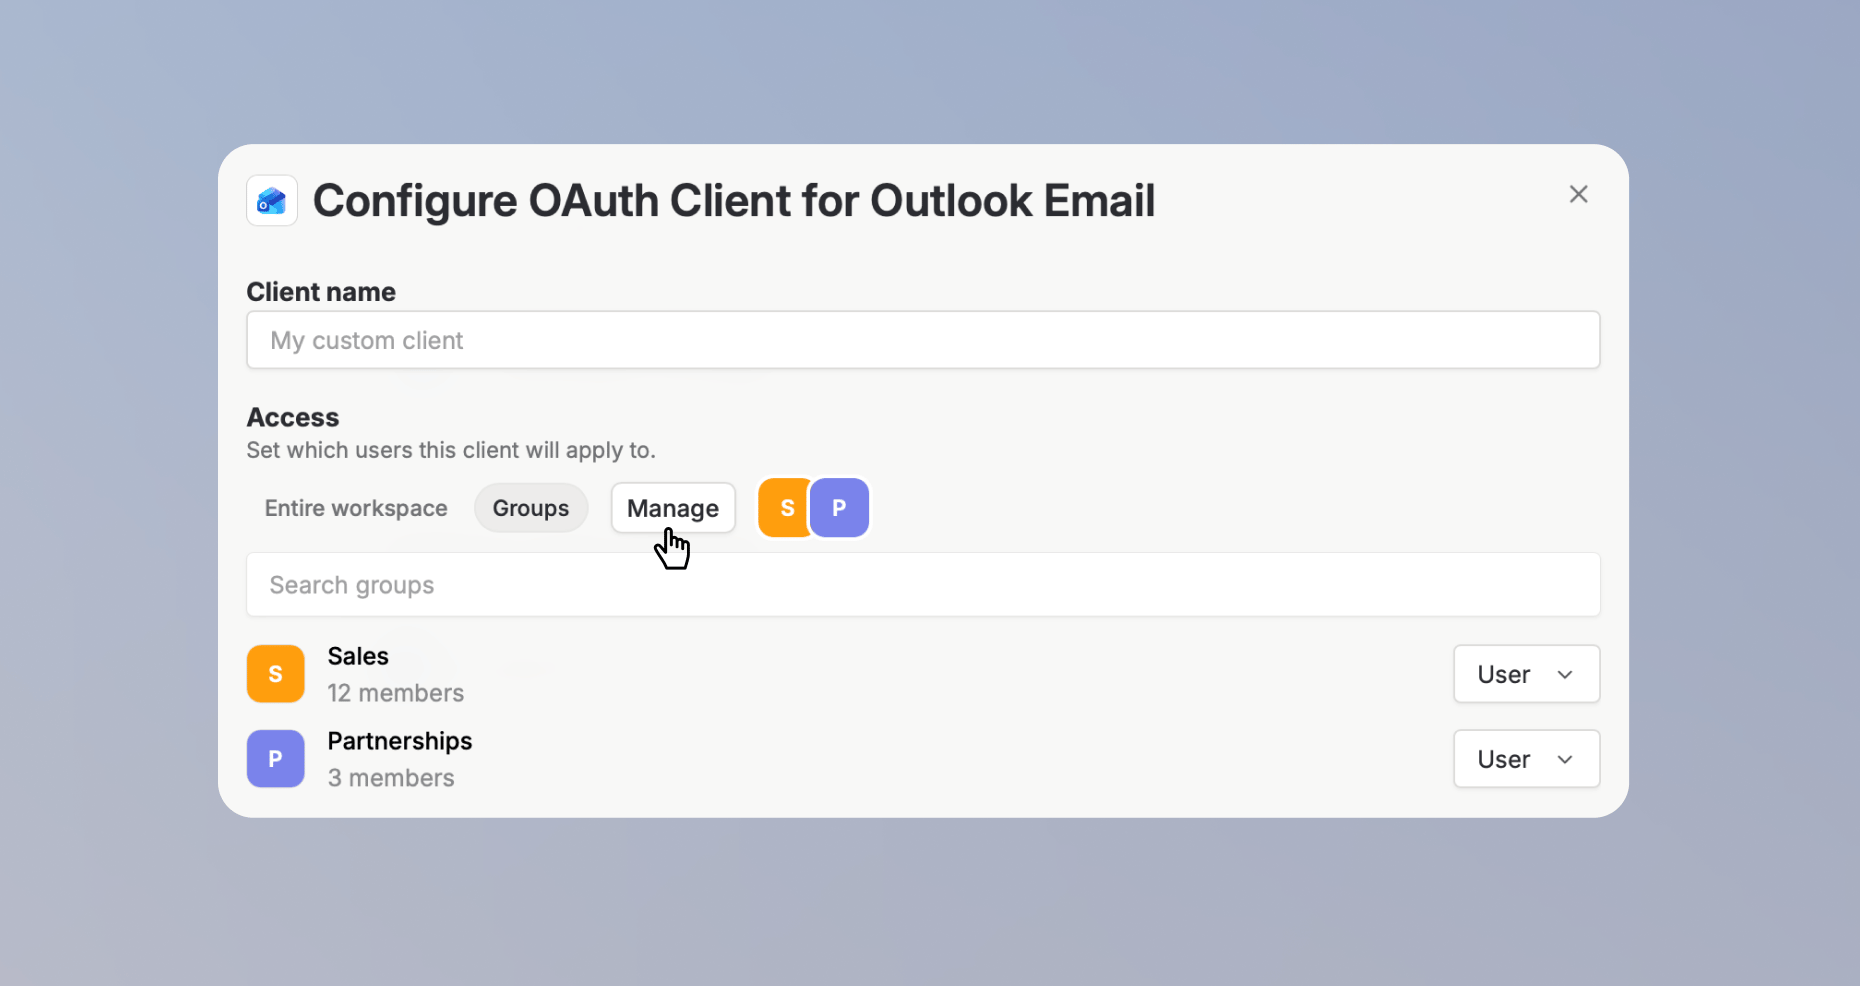 In the **Access** section, select **Groups**, then click **Manage** to choose the user group that should use this client.
Enter the Client ID, Client secret, and any fields required by the provider. Click **Save** and confirm the change. Select the saved client from the client list and confirm the switch to activate it.
Keep a client active for the entire workspace if users without a group client need to connect. A user cannot belong to groups assigned to two active OAuth clients for the same integration.
## Integration Settings Interface
The configuration dialog contains the following sections:
A read-only field displaying the redirect URL your OAuth app must use. Click the copy button to copy it exactly. The URL format is:
```
https://app.langdock.com/api/integrations/{integration-id}/callback
```
The redirect URL must match exactly. Any mismatch will cause `redirect_uri_mismatch` errors. The exact domain depends on your Langdock deployment — always copy the redirect URL from the dialog rather than constructing it manually.
Displays the OAuth scopes required for the integration to function correctly. For example, Jira requires scopes like `read:jira-work`, `write:jira-work`, `read:jira-user`, `offline_access`, and `manage:jira-configuration`.
* **Copy**: Copy all scopes to your clipboard for pasting into your OAuth app configuration.
* **Edit**: Switch to edit mode to customize scopes in a text area (advanced use cases only).
* **Reset to default scopes**: Restore the original scope list if you have modified it.
For integrations with action-level permissions, keep **Sync scopes with enabled actions** turned on unless you intentionally want to manage a fixed scope list yourself. This is the recommended default because Langdock can keep OAuth scopes in sync with enabled and shared actions.
All listed scopes must be enabled in your OAuth app. Missing scopes will cause `insufficient_scope` errors when users try to connect.
Enter your OAuth application credentials:
* **Client name** (optional): A descriptive name that identifies the client in Langdock
* **Client ID** (required): Your app's public identifier
* **Client secret** (required for most integrations): Your app's private key, stored encrypted
* **Tenant ID** (Microsoft integrations only, optional): Your Azure AD tenant identifier
## Manage Custom OAuth Clients
Each card shows the client name, access type, scope mode, and active status.
* Select an inactive client card to activate it.
* Select an active custom client card to deactivate it.
* Click the settings icon to edit the client.
* Open the client settings and click **Delete OAuth client credentials** to remove it.
* Select **Langdock client** to use the managed client for new connections. This deactivates all custom clients.
You can keep several group clients active when their members do not overlap. Only one client for the entire workspace can be active for an integration.
Deactivating a client stops new connections from using it. Existing connections remain linked to their selected client. If you delete a client, existing access tokens can continue working until authentication fails. Users must then reauthorize with an eligible active client.
## Common Configuration Errors
**Cause**: Redirect URL doesn't match exactly between Langdock and your OAuth app
**Solution**:
* Copy the redirect URL from Langdock exactly
* Check for trailing slashes or protocol mismatches
* Verify you're configuring the correct environment
**Cause**: Client ID or Client secret is incorrect
**Solution**:
* Double-check credentials from your OAuth app
* Ensure no extra spaces or characters
* Verify the client is enabled in your provider's console
**Cause**: Admin consent required but not granted
**Solution**:
* Grant admin consent in your tenant settings
* Enable user consent if appropriate for your organization
* Check tenant allowlisting requirements
**Cause**: Missing required scopes in your OAuth app
**Solution**:
* Add all scopes shown in Langdock to your OAuth app
* Users may need to reconnect after adding scopes
* Verify scope names match exactly (case-sensitive)
**Cause**: At least one user belongs to a group covered by another active OAuth client.
**Solution**:
* Review the groups assigned to both clients
* Remove the overlapping group assignment or membership
* Activate the client again
***
## Integrations Requiring Your Own OAuth Client
Some of our integrations can only be used when providing your own OAuth client. Details on how to connect them with Langdock are described in this section.
### ServiceNow
To enable this integration for your workspace, your ServiceNow system administrator must create an OAuth client, in the form of an application registry in ServiceNow, following [this](https://www.servicenow.com/docs/r/xanadu/security-management/security-incident-response/configure-application-registry-splunk.html?contentId=CHQRQznfzOrL_mxxa8MoCA) documentation.
\
**Required authentication fields**
* Provide ServiceNow Subdomain
When a user wants to create a connection with ServiceNow, they have to provide the subdomain of your ServiceNow instance.
### ServiceNow Integration Requirements
Only Cloud-hosted accounts are currently supported.
A paid ServiceNow account is required to create an application registry. View ServiceNow's plans [here](https://www.servicenow.com/lpgp/pricing.html?campid=107977\&cid=p:all:dg:b:prsp:exa:Google_CoreBrand_Top_Restructure:latam:mx\&ds_c=GOOG_LATAM_MX_ES_DEMANDGEN_ALBU_PRSP_Brand_EXA_Top-RES\&cmcid=71700000102193357\&ds_ag=Servicenow+Pricing_EXA_EN\&cmpid=58700008155106586\&ds_kids=p74103339564).
Yes. To connect by OAuth, your systems administrator should set up the right configuration within your instance to connect any user using an OAuth connection. E.g. all users need the oauth\_user role to be able to connect. Learn more about ServiceNow's [groups and permissions](https://www.servicenow.com/docs/bundle/zurich-platform-security/page/integrate/identity/task/view-permissions-for-a-group.html)
Yes. ServiceNow implements rate limiting to prevent excessive API usage. System administrators can configure rules that restrict the number of inbound REST API requests processed per hour. Learn more about ServiceNow's [usage limits](https://www.servicenow.com/docs/bundle/zurich-api-reference/page/integrate/inbound-rest/concept/inbound-REST-API-rate-limiting.html).
### Snowflake
Configuring your own OAuth client for Snowflake gives you control over authentication policies, token validity periods, and IP allowlisting within your Snowflake environment.
**Required Information:**
* **OAuth Redirect URL**: Copy this from Langdock's Snowflake integration settings page
* **Client ID**: Generated by Snowflake after creating the security integration
* **Client Secret**: Generated by Snowflake after creating the security integration
* **Authorization URL**: Your Snowflake account's authorization endpoint
The Redirect URL from Langdock must be provided in Snowflake, while the Client ID, Client Secret, and Authorization URL from Snowflake must be entered into Langdock's integration settings.
If your Snowflake account has network policies or IP allowlisting enabled, you may need to whitelist Langdock's static IP address to allow connections. See [Static IP Configuration](/en/admin/security/static-ip-configuration) for details.
### Setup Guide
In your Langdock workspace, create your new Snowflake integration, and set up a custom OAuth Client.
1. Navigate to Integrations in Langdock
2. Click "Add Integration" and select "Start from Scratch"
3. Fill in your preferred name and description for your new Snowflake integration
4. Click "Create"
5. Authentication Type: Select "OAuth 2.0" from the dropdown
6. Authentication fields: Leave blank
7. OAuth Configuration: Save your **OAuth Redirect URL**
In Snowflake, select your workspace, and create a new security integration.
1. Create a new `.sql` file, and paste the following query:
```sql theme={null}
CREATE SECURITY INTEGRATION
TYPE = OAUTH
ENABLED = TRUE
OAUTH_CLIENT = CUSTOM
OAUTH_CLIENT_TYPE = CONFIDENTIAL
OAUTH_REDIRECT_URI = ''
OAUTH_ISSUE_REFRESH_TOKENS = TRUE
OAUTH_REFRESH_TOKEN_VALIDITY = 86400;
```
2. Replace `` with a descriptive name and `` with the **OAuth Redirect URL** from Step 1.
3. Run the query to create your new security integration in Snowflake.
**Note:** Adjust your `OAUTH_REFRESH_TOKEN_VALIDITY` value based on your security policies.
1. Within the same workspace, run the following query:
```sql theme={null}
SELECT SYSTEM$SHOW_OAUTH_CLIENT_SECRETS('');
```
2. Replace `` with the name you gave your security integration in the previous step.
3. Save your **Client ID** and **Client Secret**. Store these credentials securely as they provide access to your Snowflake account.
1. Click on your account name in the bottom left corner of your Snowflake application
2. Under the Account Section, click on "View Account Details"
3. Copy your **Account URL**
1. Add your **Client ID** and **Client Secret** from Step 3 in the respective input fields of your new Langdock integration
2. In the following sections:
* Authorization URL
* Access Token URL
* Refresh Token URL
Replace only `https://example.com` with your **Snowflake Account URL** from Step 4.
Example:
```
https://example.com/oauth/authorize
```
Becomes:
```
https:///oauth/authorize
```
3. Click **Save**
Click "Add Connection" in your Snowflake integration.
* You should be directed to the Snowflake Authorization screen
* Log into your Snowflake account
You have now successfully set up your own OAuth Snowflake integration!
In the **Access** section, select **Groups**, then click **Manage** to choose the user group that should use this client.
Enter the Client ID, Client secret, and any fields required by the provider. Click **Save** and confirm the change. Select the saved client from the client list and confirm the switch to activate it.
Keep a client active for the entire workspace if users without a group client need to connect. A user cannot belong to groups assigned to two active OAuth clients for the same integration.
## Integration Settings Interface
The configuration dialog contains the following sections:
A read-only field displaying the redirect URL your OAuth app must use. Click the copy button to copy it exactly. The URL format is:
```
https://app.langdock.com/api/integrations/{integration-id}/callback
```
The redirect URL must match exactly. Any mismatch will cause `redirect_uri_mismatch` errors. The exact domain depends on your Langdock deployment — always copy the redirect URL from the dialog rather than constructing it manually.
Displays the OAuth scopes required for the integration to function correctly. For example, Jira requires scopes like `read:jira-work`, `write:jira-work`, `read:jira-user`, `offline_access`, and `manage:jira-configuration`.
* **Copy**: Copy all scopes to your clipboard for pasting into your OAuth app configuration.
* **Edit**: Switch to edit mode to customize scopes in a text area (advanced use cases only).
* **Reset to default scopes**: Restore the original scope list if you have modified it.
For integrations with action-level permissions, keep **Sync scopes with enabled actions** turned on unless you intentionally want to manage a fixed scope list yourself. This is the recommended default because Langdock can keep OAuth scopes in sync with enabled and shared actions.
All listed scopes must be enabled in your OAuth app. Missing scopes will cause `insufficient_scope` errors when users try to connect.
Enter your OAuth application credentials:
* **Client name** (optional): A descriptive name that identifies the client in Langdock
* **Client ID** (required): Your app's public identifier
* **Client secret** (required for most integrations): Your app's private key, stored encrypted
* **Tenant ID** (Microsoft integrations only, optional): Your Azure AD tenant identifier
## Manage Custom OAuth Clients
Each card shows the client name, access type, scope mode, and active status.
* Select an inactive client card to activate it.
* Select an active custom client card to deactivate it.
* Click the settings icon to edit the client.
* Open the client settings and click **Delete OAuth client credentials** to remove it.
* Select **Langdock client** to use the managed client for new connections. This deactivates all custom clients.
You can keep several group clients active when their members do not overlap. Only one client for the entire workspace can be active for an integration.
Deactivating a client stops new connections from using it. Existing connections remain linked to their selected client. If you delete a client, existing access tokens can continue working until authentication fails. Users must then reauthorize with an eligible active client.
## Common Configuration Errors
**Cause**: Redirect URL doesn't match exactly between Langdock and your OAuth app
**Solution**:
* Copy the redirect URL from Langdock exactly
* Check for trailing slashes or protocol mismatches
* Verify you're configuring the correct environment
**Cause**: Client ID or Client secret is incorrect
**Solution**:
* Double-check credentials from your OAuth app
* Ensure no extra spaces or characters
* Verify the client is enabled in your provider's console
**Cause**: Admin consent required but not granted
**Solution**:
* Grant admin consent in your tenant settings
* Enable user consent if appropriate for your organization
* Check tenant allowlisting requirements
**Cause**: Missing required scopes in your OAuth app
**Solution**:
* Add all scopes shown in Langdock to your OAuth app
* Users may need to reconnect after adding scopes
* Verify scope names match exactly (case-sensitive)
**Cause**: At least one user belongs to a group covered by another active OAuth client.
**Solution**:
* Review the groups assigned to both clients
* Remove the overlapping group assignment or membership
* Activate the client again
***
## Integrations Requiring Your Own OAuth Client
Some of our integrations can only be used when providing your own OAuth client. Details on how to connect them with Langdock are described in this section.
### ServiceNow
To enable this integration for your workspace, your ServiceNow system administrator must create an OAuth client, in the form of an application registry in ServiceNow, following [this](https://www.servicenow.com/docs/r/xanadu/security-management/security-incident-response/configure-application-registry-splunk.html?contentId=CHQRQznfzOrL_mxxa8MoCA) documentation.
\
**Required authentication fields**
* Provide ServiceNow Subdomain
When a user wants to create a connection with ServiceNow, they have to provide the subdomain of your ServiceNow instance.
### ServiceNow Integration Requirements
Only Cloud-hosted accounts are currently supported.
A paid ServiceNow account is required to create an application registry. View ServiceNow's plans [here](https://www.servicenow.com/lpgp/pricing.html?campid=107977\&cid=p:all:dg:b:prsp:exa:Google_CoreBrand_Top_Restructure:latam:mx\&ds_c=GOOG_LATAM_MX_ES_DEMANDGEN_ALBU_PRSP_Brand_EXA_Top-RES\&cmcid=71700000102193357\&ds_ag=Servicenow+Pricing_EXA_EN\&cmpid=58700008155106586\&ds_kids=p74103339564).
Yes. To connect by OAuth, your systems administrator should set up the right configuration within your instance to connect any user using an OAuth connection. E.g. all users need the oauth\_user role to be able to connect. Learn more about ServiceNow's [groups and permissions](https://www.servicenow.com/docs/bundle/zurich-platform-security/page/integrate/identity/task/view-permissions-for-a-group.html)
Yes. ServiceNow implements rate limiting to prevent excessive API usage. System administrators can configure rules that restrict the number of inbound REST API requests processed per hour. Learn more about ServiceNow's [usage limits](https://www.servicenow.com/docs/bundle/zurich-api-reference/page/integrate/inbound-rest/concept/inbound-REST-API-rate-limiting.html).
### Snowflake
Configuring your own OAuth client for Snowflake gives you control over authentication policies, token validity periods, and IP allowlisting within your Snowflake environment.
**Required Information:**
* **OAuth Redirect URL**: Copy this from Langdock's Snowflake integration settings page
* **Client ID**: Generated by Snowflake after creating the security integration
* **Client Secret**: Generated by Snowflake after creating the security integration
* **Authorization URL**: Your Snowflake account's authorization endpoint
The Redirect URL from Langdock must be provided in Snowflake, while the Client ID, Client Secret, and Authorization URL from Snowflake must be entered into Langdock's integration settings.
If your Snowflake account has network policies or IP allowlisting enabled, you may need to whitelist Langdock's static IP address to allow connections. See [Static IP Configuration](/en/admin/security/static-ip-configuration) for details.
### Setup Guide
In your Langdock workspace, create your new Snowflake integration, and set up a custom OAuth Client.
1. Navigate to Integrations in Langdock
2. Click "Add Integration" and select "Start from Scratch"
3. Fill in your preferred name and description for your new Snowflake integration
4. Click "Create"
5. Authentication Type: Select "OAuth 2.0" from the dropdown
6. Authentication fields: Leave blank
7. OAuth Configuration: Save your **OAuth Redirect URL**
In Snowflake, select your workspace, and create a new security integration.
1. Create a new `.sql` file, and paste the following query:
```sql theme={null}
CREATE SECURITY INTEGRATION
TYPE = OAUTH
ENABLED = TRUE
OAUTH_CLIENT = CUSTOM
OAUTH_CLIENT_TYPE = CONFIDENTIAL
OAUTH_REDIRECT_URI = ''
OAUTH_ISSUE_REFRESH_TOKENS = TRUE
OAUTH_REFRESH_TOKEN_VALIDITY = 86400;
```
2. Replace `` with a descriptive name and `` with the **OAuth Redirect URL** from Step 1.
3. Run the query to create your new security integration in Snowflake.
**Note:** Adjust your `OAUTH_REFRESH_TOKEN_VALIDITY` value based on your security policies.
1. Within the same workspace, run the following query:
```sql theme={null}
SELECT SYSTEM$SHOW_OAUTH_CLIENT_SECRETS('');
```
2. Replace `` with the name you gave your security integration in the previous step.
3. Save your **Client ID** and **Client Secret**. Store these credentials securely as they provide access to your Snowflake account.
1. Click on your account name in the bottom left corner of your Snowflake application
2. Under the Account Section, click on "View Account Details"
3. Copy your **Account URL**
1. Add your **Client ID** and **Client Secret** from Step 3 in the respective input fields of your new Langdock integration
2. In the following sections:
* Authorization URL
* Access Token URL
* Refresh Token URL
Replace only `https://example.com` with your **Snowflake Account URL** from Step 4.
Example:
```
https://example.com/oauth/authorize
```
Becomes:
```
https:///oauth/authorize
```
3. Click **Save**
Click "Add Connection" in your Snowflake integration.
* You should be directed to the Snowflake Authorization screen
* Log into your Snowflake account
You have now successfully set up your own OAuth Snowflake integration!